Note
Go to the end to download the full example code
Predicting Rent Prices (Regression)#
In this Demo we are using an adaptation of the Airbnb rent regression dataset to show how you can use Deepchecks to monitor and identify issues in a Rent Prediction task.
You are a Data Scientist whose company has collected historical data on the apartments within New York city, and your goal is to accurately predict the actual rent for the property given its attributes and the community feedback. This estimation is then sold as an estimated price to the landlords, helping them correctly asses the value of their property.
Recently, you have received word that some landlords in northern Manhattan are getting estimations from your platform that are way off the market price, and you are sent to investigate.
In this notebook, we’ll show how you can use deepchecks to pinpoint where these problematic predictions are coming from, and what is their root cause. Before that, we’ll start by quickly setting up deepchecks monitoring for your data and model.
Tip
To see how Deepchecks Monitoring is used, you can skip right to Analyzing Using Deepchecks
Setting You Up on Deepchecks#
Installation & API key#
In order to work with Deepchecks Monitoring, you need to:
Install with
pipthe deepchecks-client SDKLog in to the Deepchecks Monitoring app and create an organization
Obtain an API key from the app
For more details, please refer to the Quickstart.
Creating a Client#
To work with Deepchecks Monitoring we first instantiate a client object.
import os
from deepchecks_client import DeepchecksClient
# Note:  add an environment variable DEEPCHECKS_API_TOKEN and set it to your API token's value. Alternatively (not
# recommended for security reasons) copy-paste your token string here, instead of retrieving it from the environment
# variable.
token = os.getenv('DEEPCHECKS_API_TOKEN')
# Point the host to deepchecks host url (e.g. https://app.deepchecks.com. Save it to an environment variable,
# or alternatively copy-paste it here directly)
host = os.getenv('DEEPCHECKS_API_HOST')
# Create a DeepchecksClient with relevant credentials
dc_client = DeepchecksClient(host=host, token=token)
We’ll use this object during the remainder of this example.
Creating a Model & Model Version#
In this section we’ll create a model and a model version, using the training data as the reference. Reference data is a dataset to which we wish to compare our production data stream. To learn more about models and model versions, and other important terms in Deepchecks please refer to the Concepts guide.
Getting the Data#
We’ll start by downloading the training data from the deepchecks testing package. This training data will be used to set the reference for the model version. We’ll also download the pre-calculated predictions for this data.
from deepchecks.tabular.datasets.regression.airbnb import load_data_and_predictions

ref_df, ref_predictions = load_data_and_predictions(data_format='Dataframe')
ref_df.head(2)
So what do we have? Let’s note the special columns in our data:
timestamp - The timestamp of the sample (seconds since epoch)
price - Our label
All the other columns are features that can be used by our model to predict the price. We note that there are some categorical features, and some numeric ones.
Data Schema#
A Schema file contains the description of the data (features and additional data) associated with a model version. To learn more about creating a schema, please refer to the Tabular Setup guide.
It is highly recommended to review the created schema file before moving forward to creating the model version.
In order to create a schema file, the easiest way is to first define a deepchecks Dataset object, which contains the actual data (DataFrame) together with metadata about the role of each column.
from deepchecks.tabular import Dataset
timestamp, label_col = 'timestamp', 'price'
train_dataset = Dataset(
    ref_df, label=label_col,
    features=['room_type', 'neighbourhood', 'neighbourhood_group', 'has_availability', 'minimum_nights',
              'number_of_reviews', 'reviews_per_month', 'calculated_host_listings_count', 'availability_365'],
    cat_features=['neighbourhood_group', 'neighbourhood', 'room_type', 'has_availability'])
We’ll create the schema file, and print it to show (and validate) the schema that was created.
from deepchecks_client import create_schema, read_schema

schema_file_path = 'schema_file.yaml'
create_schema(dataset=train_dataset, schema_output_file=schema_file_path)
read_schema(schema_file_path)
Schema was successfully generated and saved to schema_file.yaml.

{'additional_data': {'Unnamed: 0': 'integer'}, 'features': {'availability_365': 'integer', 'calculated_host_listings_count': 'integer', 'has_availability': 'categorical', 'minimum_nights': 'integer', 'neighbourhood': 'categorical', 'neighbourhood_group': 'categorical', 'number_of_reviews': 'integer', 'reviews_per_month': 'numeric', 'room_type': 'categorical'}}
Note
For conveniently changing the auto-inferred schema it’s recommended to edit the textual file with an app of your choice.
After editing, you can use the read_schema
function to verify the validity of the syntax in your updated schema.
Feature Importance#
In order to provide the best analysis and alerts, we should let Deepchecks know about the relative importance of the features to the model’s prediction. In this example we’ll load pre-calculated features importnaces, but these can be easily calculated using deepchecks, or other methods (such as SHAP). Note that the feature importance values should be normalized to sum to 1.
from deepchecks.tabular.datasets.regression.airbnb import load_pre_calculated_feature_importance
feature_importance = load_pre_calculated_feature_importance()
Creating a Model Version#
We’ll use the create_tabular_model_version method. Calling it, we can create both our
model, our model version and define the reference data with one call. We’ll also let Deepchecks know this is a
regression task, so we will set the task_type argument. Lastly, in order to fully define the reference,
we must also pass model predictions for the reference data. For classification tasks, not that it’s highly recommended
to also send the predicted probabilities.
model_name = 'Rent Prediction - Example'

model_version = dc_client.create_tabular_model_version(model_name=model_name, version_name='ver_1',
                                                       schema=schema_file_path,
                                                       feature_importance=feature_importance,
                                                       reference_dataset=train_dataset,
                                                       reference_predictions=ref_predictions,
                                                       task_type='regression')
Model Rent Prediction - Example was successfully created!. Default checks, monitors and alerts added.
Model version ver_1 was successfully created.
Reference data uploaded.
Now we know our model, model version and reference data where set, and we’re ready to start uploading production data.
Uploading Production Data#
Once in production, uploading data can be done either sample by sample, or by batch. To read more, please referTo read more, refer to the Production Data Guide. Here we’ll show how to use the batch upload method.
prod_data, prod_predictions = load_data_and_predictions(data_format='DataFrame', load_train=False, data_size=100_000)
Uploading a Batch of Data#
Uploading the First Batch#
Let’s start by uploading the first part of the dataset
prod_data[timestamp] = prod_data[timestamp].astype(int) // 10 ** 9  # Convert to second-based epoch time
timestamps = prod_data[timestamp].unique()
end_of_first_half = timestamps[3 * int(len(timestamps) // 4)]  # This is the first 3 weeks of the production data

first_half_df = prod_data[prod_data.timestamp < end_of_first_half]
second_half_df = prod_data[prod_data.timestamp >= end_of_first_half]

model_version.log_batch(sample_ids=first_half_df.index,
                        data=first_half_df.drop([timestamp, label_col], axis=1),
                        timestamps=first_half_df[timestamp], predictions=prod_predictions[:len(first_half_df)])
/home/runner/work/monitoring/monitoring/.venv/lib/python3.11/site-packages/deepchecks_client/tabular/client.py:681: UserWarning:

Index of provided "data" dataframe completely matches "sample_ids" array, are you sure that "samples_ids" array is correct and contains unique sample identifiers?

10000 new samples sent.
10000 new samples sent.
10000 new samples sent.
10000 new samples sent.
10000 new samples sent.
10000 new samples sent.
10000 new samples sent.
5007 new samples sent.
Upload finished successfully but might take time to ingest into the system, see http://127.0.0.1:8000/configuration/models for status.
Uploading the Second Batch#
Now let’s upload the second half of the dataset.
model_version.log_batch(sample_ids=second_half_df.index,
                        data=second_half_df.drop([timestamp, label_col], axis=1),
                        timestamps=second_half_df[timestamp], predictions=prod_predictions[len(first_half_df):])
/home/runner/work/monitoring/monitoring/.venv/lib/python3.11/site-packages/deepchecks_client/tabular/client.py:681: UserWarning:

Index of provided "data" dataframe completely matches "sample_ids" array, are you sure that "samples_ids" array is correct and contains unique sample identifiers?

10000 new samples sent.
10000 new samples sent.
4993 new samples sent.
Upload finished successfully but might take time to ingest into the system, see http://127.0.0.1:8000/configuration/models for status.
Uploading The Labels#
The labels are global to the model, and not specific to a version. Therefore, to upload them we need the model client. You can do this directly after uploading the predictions, or at any other time.
model_client = dc_client.get_or_create_model(model_name)
model_client.log_batch_labels(sample_ids=prod_data.index, labels=prod_data[label_col])
10000 labels sent.
10000 labels sent.
10000 labels sent.
10000 labels sent.
10000 labels sent.
10000 labels sent.
10000 labels sent.
10000 labels sent.
10000 labels sent.
10000 labels sent.
Making Sure Your Data Has Arrived#
If you’re not sure if your data has arrived, please refer to the relevant section in the Production Data guide.
Analyzing Using Deepchecks#
Now that you have our data in Deepchecks, you can start monitoring and analyzing it. Let’s remember that you’ve received some complaints about the model performance from some of your customers, can you find the source of the issue?
Dashboard & Alerts - Finding the issue#
When you log in to Deepchecks, you’ll be greeted by the Dashboard, in which you can view all the monitors defined for
your models. Selecting our Loan Default - Example model, we see the default monitors and their corresponding
default alert rules.
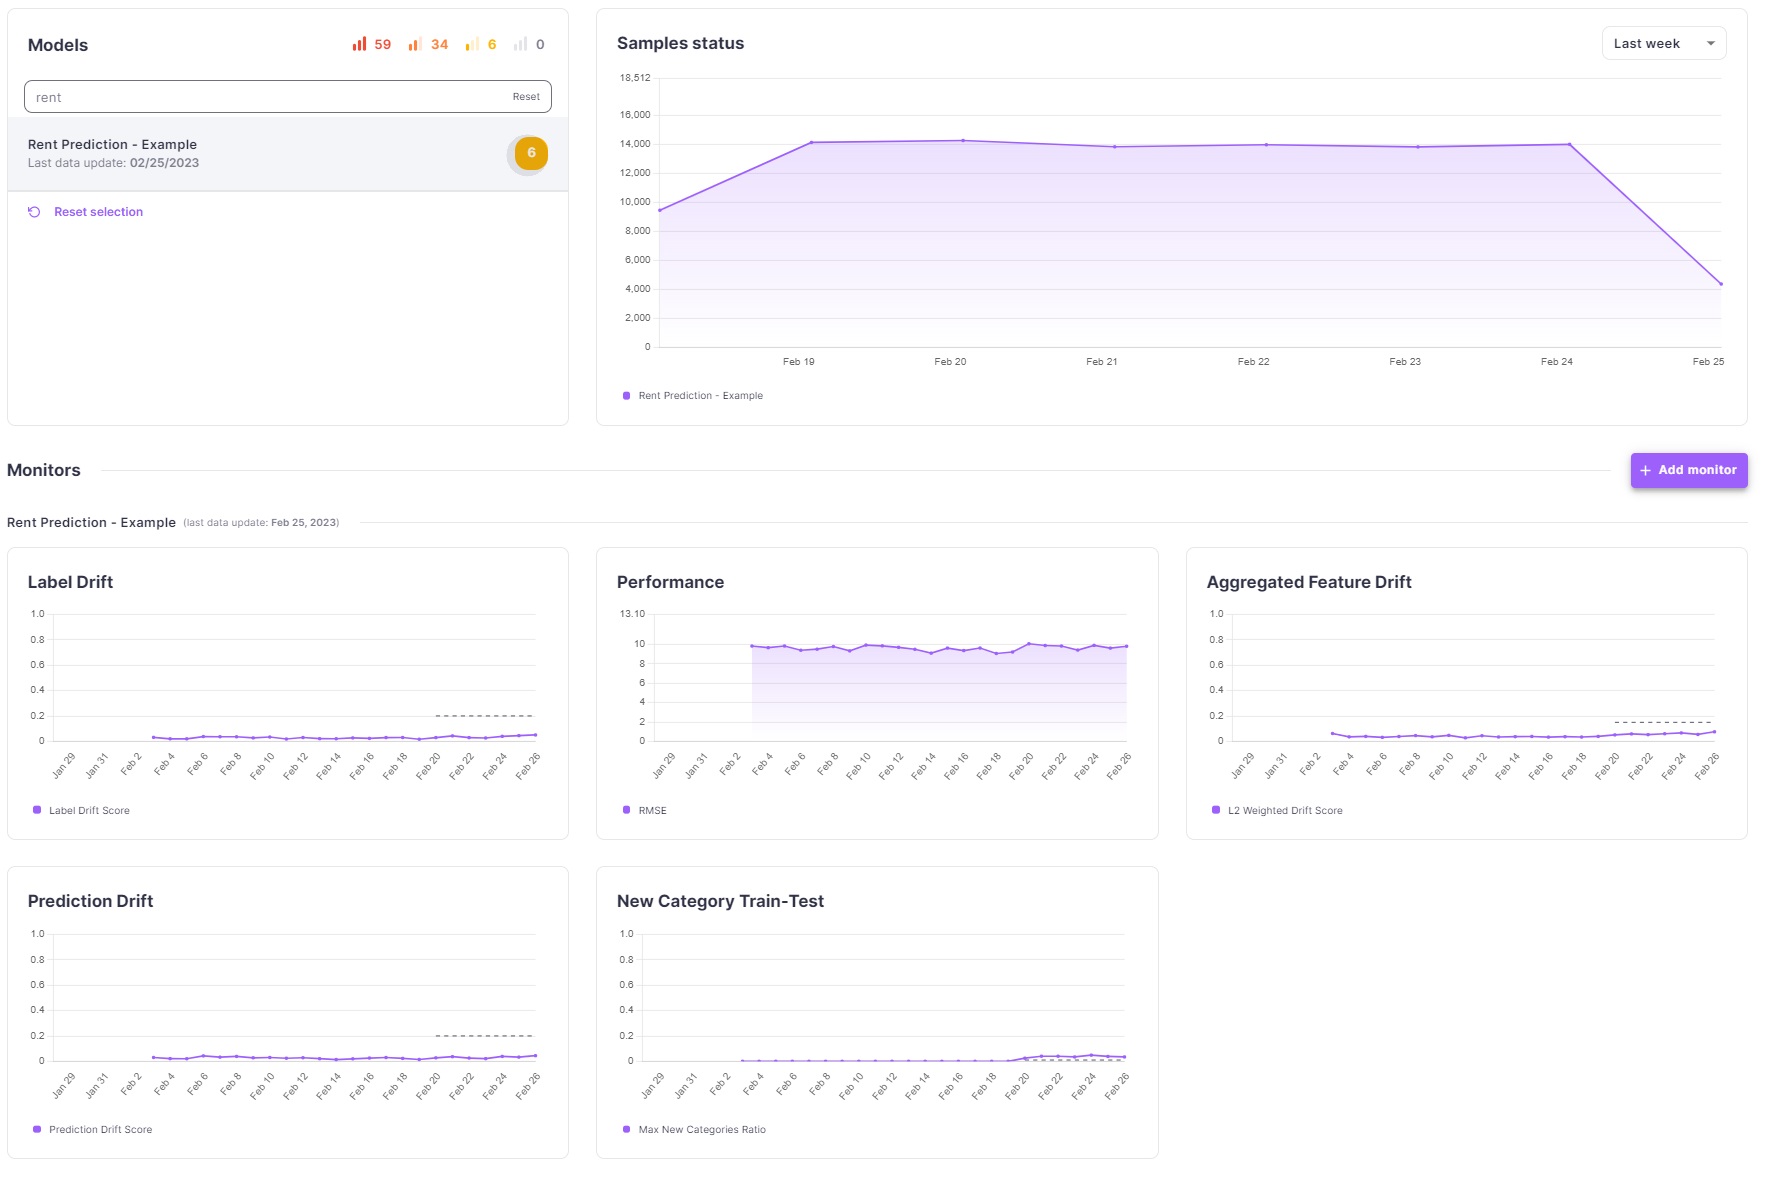
We can see that there are a couple of alerts of medium importance (yellow) that raised. Let’s click on the alert in the Models table to see the alert details.
Once in the alerts screen, you can see the list of all current alerts on your model. Clicking on that alert will open an alert analysis screen. This screen has three main components - the monitor history graph, the segment explorer and the check details.
The monitor history graph shows the monitor’s value over time and the point at which the alert was triggered.
The segment explorer allows you to see what was the value of the check at the time of the alert, in different segments of the data.
The check details section shows the details of the check that triggered the alert.
In this case, you can see in the check details section that there is a new category in the room_type feature,
This is the case for the “All Data” segment, but does this issue originate from a specific segment? Let’s find out.
Segmenting on the neighborhood feature, we can easily see that the new category is only present in the Harlem
neighborhood. In it, room_type has a new category None, appearing in 3.82% of the samples in the selected
date.
Analysis - Performance Check#
Now that we’ve found the source of the issue, we can go ahead and check the performance of the model on the problematic samples. To do so, we’ll now go to the analysis screen. The analysis screen is where you can freely explore your data. There, you can run any of the checks you defined for your model over different time periods and segments and easily change the parameters of the checks.
In our case, we’ll head over to the Performance check. We’ll select one of the time windows in which we saw the drift and select room_type as the segmentation feature. Right away we see that the samples with “None” room type have a higher RMSE than the rest of the samples. This is indeed the source of our issue and the complaints we’ve received from our customers! We can now go fix this integrity issue that caused these “None” room types to appear in the data.
Alerts - Defining a new alert#
Now that we know for sure that the complaints have been coming from landlords in the Harlem neighborhood, we can define an alert to notify us specifically of any future changes in this neighborhood. To do that we head to the Alert Rules screen, nested under the Configuration menu. Here we can define our alert, and make sure it runs only on data that comes from the Harlem neighborhood.
Cleaning up#
If you wish to delete this model from your environment, you can do that using the delete_model function.
CAUTION: This will delete the model, all model versions, and all associated datasets.
# dc_client.delete_model(model_name)
Total running time of the script: (0 minutes 55.043 seconds)